I was feeling in the mood for a summer fruit inspired manicure. A few years ago I did strawberry nails and really enjoy how simple they were to create yet how awesome the finished product looked. I've been playing with the Masura magnetic polishes a lot and decided to give a slightly different twist on that strawberry manicure I previously did.
Here's a tutorial video showing all the steps, I've also linked all the products I used below.
This easy summer strawberry manicure uses the Masura magnetic nail polish to give a great textured strawberry look to the nails. You'll see why it looks textured in the tutorial video. I thought that was fun to do!
These Masura magnetic nail polishes are so much fun! Magnetic nail polish gives that awesome cat's eye effect across the nails as you move your hand once you have used the magnet on the wet polish. Remember to use the magnet over the magnetic nail polish while it is wet, otherwise you won't be able to see the cat's eye effect come through on the nails. Magnetic nail polish is great for a beginner nail artist because it is really easy to use.
China Glaze hot flash from the China Glaze Lite Brites Collection is the base color for this manicure. Hot Flash is a great true red leaning strawberry red color by China Glaze. It really looks great as the base for this strawberry nail art.
I used the Masura White Base White Quartz in order to create a background shade for the Masura magnetic polish to really stand out on and also the seeds of the strawberries, This also helps give the manicure texture by building up the nail polish on the nail.
What do you think? Have you done strawberry nail art before?
Products Used:
Masura Magnetic Nail Polish: http://www.beautometry.com/Masura_s/2114.htm
Hit the Bottle ASAP Top Coat:
http://www.beautometry.com/Hit_the_Bottle_s/1872.htm
China Glaze Hot Flash:
http://www.beautometry.com/ChinaGlaze_s/1947.htm
Masura White Base Coat:
http://www.beautometry.com/Masura_Base_Coat_White_Quartz_p/masura-base-whitequartz.htm
Masura Magnet:
http://www.beautometry.com/Masura_Magnet_p/masura-acc-magnet.htm
MoYou London Your Magic Workshop:
http://www.beautometry.com/MoYouLondon_SA_YourMagicWorksh_p/moyoulondon-sa-yourmagicworksh.htm
_________________________________________________________________
Where to purchase nail polish, nail stamping plates, and nail art products from all over the world:
https://www.beautometry.com/
https://www.instagram.com/beautometry/
https://www.pinterest.com/beautometry/
https://www.facebook.com/Beautometry/
https://twitter.com/beautometry
Showing posts with label China Glaze. Show all posts
Showing posts with label China Glaze. Show all posts
Tuesday, July 25, 2017
Thursday, April 27, 2017
Review: Seche Vive
Last year Seche came out with a new top coat: Seche Vive. It's considered a gel-like top coat but no light needed. I've been trying it out over the past year and have a few thoughts to share on it.
I've been using it over regular polish, thermals, holographic polishes, and stamping to see how it performs. Here's a photo of a manicure I just did using China Glaze Fresh Prince-ss as the base, Bow Thermo Top Coat Red over that, and then Powder Perfect Hathor over that on the accent nail. I really like how the red tip still shows through a bit on the accent nail making it look almost like a gradient. I finished the manicure with Seche Vive as the top coat.
You can see a previous manicure with stamping here.
On stamping, this top coat does NOT smear! It's awesome. I'd say the polish feels thicker than normal Seche Vite (which I also love, but can smear stamping easily if you don't float the top coat). The polish spreads like butter, goes on so smoothly on the nail and dries just like Seche Vite with that wonderful glassy finish. Over the cremes it also performs wonderfully.
Something I know a lot of people worry about is how a top coat will work over a holographic polish. The stamping manicure linked above also has a holographic polish and the Powder Perfect in this look has those very sparkly microglitters in it. The top coat did not dull these finishes. It also did not mess up the Bow thermal top coat. In the Bow polish, there are holographic super-micro-tiny particles and those shine right through.
Overall, I am very impressed with this top coat. It performs wonderfully and has all the best things I like about Seche Vite in it. The one thing I don't necessarily like is that it isn't in a clear bottle. I like seeing how much I have left and obviously it's hard to be able to tell the fill line in this bottle. But, I guess if that's the worst it has then I can live with that!
Have you tried this top coat? What do you think?
 |
| Seche Vive Top Coat |
I've been using it over regular polish, thermals, holographic polishes, and stamping to see how it performs. Here's a photo of a manicure I just did using China Glaze Fresh Prince-ss as the base, Bow Thermo Top Coat Red over that, and then Powder Perfect Hathor over that on the accent nail. I really like how the red tip still shows through a bit on the accent nail making it look almost like a gradient. I finished the manicure with Seche Vive as the top coat.
You can see a previous manicure with stamping here.
On stamping, this top coat does NOT smear! It's awesome. I'd say the polish feels thicker than normal Seche Vite (which I also love, but can smear stamping easily if you don't float the top coat). The polish spreads like butter, goes on so smoothly on the nail and dries just like Seche Vite with that wonderful glassy finish. Over the cremes it also performs wonderfully.
Something I know a lot of people worry about is how a top coat will work over a holographic polish. The stamping manicure linked above also has a holographic polish and the Powder Perfect in this look has those very sparkly microglitters in it. The top coat did not dull these finishes. It also did not mess up the Bow thermal top coat. In the Bow polish, there are holographic super-micro-tiny particles and those shine right through.
Overall, I am very impressed with this top coat. It performs wonderfully and has all the best things I like about Seche Vite in it. The one thing I don't necessarily like is that it isn't in a clear bottle. I like seeing how much I have left and obviously it's hard to be able to tell the fill line in this bottle. But, I guess if that's the worst it has then I can live with that!
Have you tried this top coat? What do you think?
Monday, August 29, 2016
Peacock Inspired Nail Stamping: Faux Duochrome
I stumbled upon a neat technique to create a sort of faux duo-chrome look between 2 polishes. I really liked the way it looked so I decided to play around and created this look with it.
I first started with a thin coat of China Glaze Towel Boy Toy and then a thin coat of China Glaze Kiwi Cool-ada. Then, I finished with a third thin patchy coat of China Glaze Towel Boy Toy. The end effect was that you could see some of the color showing through in certain areas and it really looked like different colors across the nail as I moved my fingers. I think it looked like a faux duo-chrome and was really easy to do!

After adding Seche Vite top coat, I stamped with Hit the Bottle As Black as Night using the MoYou Rectangular stamper and MoYou London Mandala plate 02 (the image in the upper left corner).

I love the way this turned out! It reminds me of a peacock's feathers.


Do you think it looks kind of like a duo-chrome?
Friday, August 26, 2016
Reminiscent of Hawaii with China Glaze Electric Nights and Lite Brites
I've been feeling in a neon mood so I decided to try a gradient with some of the China Glaze neons from the Electric Nights and Lite Brites collection. I chose an orange and yellow from each for this design.
Using China Glaze Whip It Good, China Glaze Daisy Know My Name?, China Glaze None of Your Risky Business, and China Glaze Home Sweet House Music and the Beautometry Gradient Sponge set I created a base gradient for the stamping.
Then I stamped using Hit the Bottle Black and images from the MoYou London Tropical Collection plate 04 with the MoYou London Rectangular stamper.

I reversed the gradient for the accent nail. I just love this look! So bright :)

Monday, February 9, 2015
2015 Valentine's Day Challenge: Red Passion
Today's theme for the 2015 Valentine's Day Challenge is Red Passion.

Of course I knew I wanted to use red polish, so I put China Glaze Phat Santa on all my nails and decided to do the thumb and ring finger as accents with Sinful Colors Dazzle.


I topped everything with Seche Vite and there you have it :) I like how this turned out, what would you do for the theme "red passion?"


Of course I knew I wanted to use red polish, so I put China Glaze Phat Santa on all my nails and decided to do the thumb and ring finger as accents with Sinful Colors Dazzle.
Using Nailways Springtime Love is in the Air plate, I stamped the xoxo full nail design on the accent nails with Funky Fingers Dark Knight and the rest of the nails with Funky Fingers Pop Artist.
I topped everything with Seche Vite and there you have it :) I like how this turned out, what would you do for the theme "red passion?"
Tuesday, January 20, 2015
Cinnamon Candy Hearts
My manicure for today looks like candy. Both my DH and I think it looks like some sort of cinnamon candy for St. Valentine's Day. He really likes cinnamon candies. What candy do you like?
I used 2 images from the Sugar Bubbles SB011 plate.


Have you ever done some nail art that made your nails look like candy?
I used 2 images from the Sugar Bubbles SB011 plate.
I started off with China Glaze Phat Santa on all nails. Then stamped the images with Konad White stamping polish and topped it off with Seche Vite.
Have you ever done some nail art that made your nails look like candy?
Thursday, November 13, 2014
C is for Copycat
Today for the A2Z challenge we have C is for Copycat. I decided to do a cat theme with the cat from BM04 repeated/copied on my nails. I also did the fish from that same plate in a repeated pattern.
I used a China Glaze red for the base and stamped everything with Konad White and then colored in the cats with Ulta Concrete Evidence and dotted in LA Color Addict in Hooked to give the grey some blue spots.

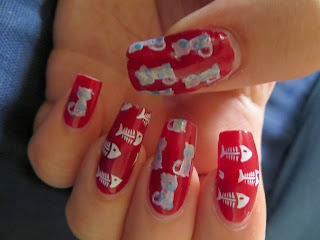


My thumb nail is curving weird, ugh. Hopefully it will improve as my nails continue growing :(
You can see the other manicures for this week's challenge here:
I used a China Glaze red for the base and stamped everything with Konad White and then colored in the cats with Ulta Concrete Evidence and dotted in LA Color Addict in Hooked to give the grey some blue spots.


My thumb nail is curving weird, ugh. Hopefully it will improve as my nails continue growing :(
You can see the other manicures for this week's challenge here:
Friday, May 17, 2013
Seven Deadly Sins Nail Art Challenge: Gluttony - Cocktail Hour!!
My nails today represent a cocktail hour during springtime. I really love the end result, it looks so Florida to me and my husband thinks it also looks sort of like some sort of ceramic piece/pattern.
 This is the second part of the Seven Deadly Sins Challenge: Gluttony.
I am only doing one day for each of the weekly challenges. I chose to do "Skip your diet and paint something that makes your stomach growl." I love drinking slushy drinks (usually non-alcoholic) and enjoy a glass of wine every once in a while.
I thought this would be a cute spring manicure to do for the challenge.
I started with a base of Funky Fingers Daiquiri on Deck (very fitting for a cocktail theme, right?) and then did different stamping on each nail.


Starting with the pinky, I put a coat of Funky Fingers Neon Green Crackle first and then used BM-05 to stamp the grape design with China Glaze Virtual Violet. I did the same thing for all nails on both hands.
The ring finger has Glitter Gal 24 Carat stamped with RA-107 and the sort of water-marbled look design. Then, I stamped the same design again with Sally Hansen Xtreme Wear in Emerald City followed by another stamp with Glitter Gal 24 Carat. I offset each one to give a holographic design effect to the nail.
The middle finger has the flourish in the lower left corner of BM-224 stamped with OPI Did It On Em (I thought this image looked sort of like a citrus rind). Then, I stamped BM-208 first with OPI Green-Wich Village and then Sally Hansen Xtreme Wear in Emerald City to give a shadowy effect (I thought this could be mint leaves).
The index finger is first stamped with the citrus image from BM-209 and Funky Fingers Ectoplasmic. Then, I stamped the leafy image from BM-05 with Sally Hansen Xtreme Wear in Emerald City.
The thumb has a wine theme going on (might have to do this as a full manicure someday, my husband really liked it). I started with the grapevine and leaf image from RA-115 stamped with OPI Uh-Oh Roll Down the Window. I really like that color for the grape-leaves and it stamped really well too. I then used the grape image again from BM-05 with China Glaze Virtual Violet.

 I fished it all off with Seche Vite topcoat and really enjoy the end result. What do you think?


 This is the second part of the Seven Deadly Sins Challenge: Gluttony.
 I am only doing one day for each of the weekly challenges. I chose to do "Skip your diet and paint something that makes your stomach growl." I love drinking slushy drinks (usually non-alcoholic) and enjoy a glass of wine every once in a while.
I thought this would be a cute spring manicure to do for the challenge.
I started with a base of Funky Fingers Daiquiri on Deck (very fitting for a cocktail theme, right?) and then did different stamping on each nail.


Starting with the pinky, I put a coat of Funky Fingers Neon Green Crackle first and then used BM-05 to stamp the grape design with China Glaze Virtual Violet. I did the same thing for all nails on both hands.
 |
| BM-05 |
The ring finger has Glitter Gal 24 Carat stamped with RA-107 and the sort of water-marbled look design. Then, I stamped the same design again with Sally Hansen Xtreme Wear in Emerald City followed by another stamp with Glitter Gal 24 Carat. I offset each one to give a holographic design effect to the nail.
 |
| RA-107 |
The middle finger has the flourish in the lower left corner of BM-224 stamped with OPI Did It On Em (I thought this image looked sort of like a citrus rind). Then, I stamped BM-208 first with OPI Green-Wich Village and then Sally Hansen Xtreme Wear in Emerald City to give a shadowy effect (I thought this could be mint leaves).
 |
| BM-208 |
 |
| BM-224 |
The index finger is first stamped with the citrus image from BM-209 and Funky Fingers Ectoplasmic. Then, I stamped the leafy image from BM-05 with Sally Hansen Xtreme Wear in Emerald City.
 |
| BM-209 |
The thumb has a wine theme going on (might have to do this as a full manicure someday, my husband really liked it). I started with the grapevine and leaf image from RA-115 stamped with OPI Uh-Oh Roll Down the Window. I really like that color for the grape-leaves and it stamped really well too. I then used the grape image again from BM-05 with China Glaze Virtual Violet.
 |
| RA-115 |


Wednesday, September 19, 2012
Swatch: China Glaze Midnight Kiss
 | |||
| China Glaze Midnight Kiss |
You can see in the photo is is still a little sheer, but it applies nicely and builds opacity.
Saturday, February 4, 2012
Santa and his Chimney

Here is a photo of the items I used:
-OPI Girls Just Want to Play
-OPI Baby It's "Coal" Outside
-China Glaze Sexagon
-Ulta Set The Nude
-Seche Vite Top Coat (Not pictured)
-XL Stamping Plate A
 Started out with OPI Girls Just Want to Play as a base on all nails.
- Took OPI Baby It's Coal Outside with the "brick-like" image from the stamping plate and did pointer, middle and pinky fingers. I then did those 3 tips as well. I put China Glaze Sexagon on my ring finger as an accent to be sort of like snow. I then painted my thumb with the Ulta polish and drew the santa face with a dotting tool. I used Konad White and Red for the hair and hat details.
 Here's the finished look! LOVE the holo in China Glaze Sexagon.

 Interesting close-up of the holograph in regular evening light. I thought this looked really cool. Kind of like trying to take a photo of fireworks or lights at night.
 Here's a neutral eye look I also did. I used some colors found in a pallette I bought around Christmas time at Dollar General.
Thursday, January 26, 2012
China Glaze For Audrey, OPI Mermaid's Tears and Silver Shatter
 This manicure allowed me to compare China Glaze For Audrey and OPI Mermaid's Tears. The OPI was used for the accent nail. You can see the difference between the 2 colors easily. Mermaid's Tears leans greener than For Audrey. I actually like both colors very well and both applied nicely. I then used the OPI Silver Shatter on the accent nail and just love the combination!
Here is a close-up to show the sparkles in OPI Silver Shatter. It's a greart formula, not as thick as the black, and shattered nicely.
Subscribe to:
Comments (Atom)