There's a new technique on the block, the double processed stamping technique. It was devised by Joey in Adventures in Stamping and I decided to make a tutorial so it's easier to understand.
Here's a little breakdown if reading it might be easier for you to understand.
First, take the image/pattern that you want to be on the top of everything and stamp that like you regularly would.
Then, take the next image and stamp that like normal, except that that first one is still on the stamp. This will cause the first image to only appear where the second image has the etching on the plate.
Repeat this as many times as you want ad then stamp on your nail.
Here's the video tutorial so you can actually see what it is :)
Showing posts with label tutorial. Show all posts
Showing posts with label tutorial. Show all posts
Sunday, January 25, 2015

Wednesday, July 24, 2013
Iron Man 3 Movie Manicure + Tutorial!!
Today I have a very intricate design, but don't worry, I created a YouTube tutorial to help everyone recreate if too :)

Here are some photos I took while creating the look:


On the thumb, I have AEngland Holy Grail (Limited Edition), Pointer and Pinky Fingers- Glitter Gal Serpent Black, Middle Finger- AEngland Perceval, Ring Finger- AEngland Excalibur.
I used some Kleancolor large Hexagonal Glitters on the Pointer and Pinky finger:

I did some double-stamping techique and even used some Sharpie Marking Pens to create this look. I am overall very pleased with how it turned out.


I even got to use a new stamping plate! I used the Gals Princess Set GA-7 stamping plate to create the chest plate area for the middle finger:

And, here's the finished look!

What do you think? If you want to see more YouTube tutorials, subscribe and like my video. And click to follow my blog so you don't miss any of my manicures :)
Tuesday, July 9, 2013
July Neon Flower Manicure
The sun had been shining very well the last few days, then all of a sudden BAM overcast! So, to reminisce about the sun I decided to do a neon manicure and just had to add flowers.
Here's the finished look:

Looks like a Christmas cactus!
Here's the tutorial for how to get the look and what tools and products I used:
What do you think? What kinds of flower art have you been doing?
Here's the finished look:

Looks like a Christmas cactus!
Here's the tutorial for how to get the look and what tools and products I used:
What do you think? What kinds of flower art have you been doing?
Thursday, July 4, 2013
Patriotic Manicure + Youtube Tutorial!
Today I have a very first for this blog, a youtube tutorial! I decided it is easier to explain some thing by actually explaining them in a video. Let me know what you think about the video and any suggestions or requests you have for future posts.
Without further adieu, here is my 4th of July patriotic manicure:
 Here's the video tutorial:
Here's a photo in the sun to see all the awesome holographic rainbows:

Hope you had a Happy 4th of July!
Without further adieu, here is my 4th of July patriotic manicure:

Here's a photo in the sun to see all the awesome holographic rainbows:

Hope you had a Happy 4th of July!
Saturday, April 27, 2013
Ice Cream Nails Tutorial
This week, She Who Does Nail Art Challenges on facebook had a challenge of fast food. Being that ice cream is my favorite food I decided to do nails inspired by Dairy Queen. It was so easy to do that I also made a tutorial for it from start to finish.
Here is the finished manicure:

Tutorial:
1. Base coat of OPI San Tan-Tonio
2. Stamped on edge of all nails with OPI You Don't Know Jacques! and BM-208


3. Stamped on edge of nails (careful not to cover up original lighter brown color) with OPI Suzi Loves Cowboys and BM-209


4. Used Sinful Colors striper polish in Bad Chick (white) to make ice cream design on other end of nails and filled in completely. The reason I did this is so that the color I ultimately use for the ice cream shows up better against the brown cone background.

5. Used Finger Paints Chrysanthe-Mum's the Word to make the ice cream part of the cone.
6. Added black spots with a dotting tool using Funky Fingers Black Knight to make the ice cream look like mint chocolate chip.


What an easy manicure that looks great too!! What is your favorite flavor of ice cream?
Here is the finished manicure:

Tutorial:
1. Base coat of OPI San Tan-Tonio
 |
| OPI San Tan-Tonio |
2. Stamped on edge of all nails with OPI You Don't Know Jacques! and BM-208


3. Stamped on edge of nails (careful not to cover up original lighter brown color) with OPI Suzi Loves Cowboys and BM-209


4. Used Sinful Colors striper polish in Bad Chick (white) to make ice cream design on other end of nails and filled in completely. The reason I did this is so that the color I ultimately use for the ice cream shows up better against the brown cone background.

5. Used Finger Paints Chrysanthe-Mum's the Word to make the ice cream part of the cone.
6. Added black spots with a dotting tool using Funky Fingers Black Knight to make the ice cream look like mint chocolate chip.


What an easy manicure that looks great too!! What is your favorite flavor of ice cream?
Saturday, April 6, 2013
Strawberry Nails Tutorial
Just in time for Spring, I decided to do a nail tutorial! Strawberry nails are super easy and fun to create :)
First, put down your basecoat of any type of strawberry red polish you like.
The next step is to take a white polish and paint where the leaves of the strawberry will go, you can put them on either side of your nail depending on what orientation you want the strawberries to face. I used just a regular Sinful Colors white striper polish to accomplish this:

Next, take a green polish to paint over where you made the white leaves design. The reason for the white was to make sure that the green really stands out against the red background. I used a green Sinful Colors Striper polish for this. Then, you take yellow to make the seeds, which are little oval dots along the nail. Just like a strawberry!

And, here is the final product:

Not only was this manicure fun to create, it is fun to wear for spring!
Did you try it too? Feel free to post your links to your version in the comments below :)
First, put down your basecoat of any type of strawberry red polish you like.
 |
| Sinful Colors |
The next step is to take a white polish and paint where the leaves of the strawberry will go, you can put them on either side of your nail depending on what orientation you want the strawberries to face. I used just a regular Sinful Colors white striper polish to accomplish this:

Next, take a green polish to paint over where you made the white leaves design. The reason for the white was to make sure that the green really stands out against the red background. I used a green Sinful Colors Striper polish for this. Then, you take yellow to make the seeds, which are little oval dots along the nail. Just like a strawberry!

And, here is the final product:

Not only was this manicure fun to create, it is fun to wear for spring!
Did you try it too? Feel free to post your links to your version in the comments below :)
Thursday, March 28, 2013
Ivy Manicure Using RA-120
Today I feel like showing a spring manicure! It has been snowing a bit, but that doesn't mean my nails can't sport the new season :)
Here are the materials I used:

I first painted all my nails with Funky Fingers Gesso, followeed by Kleancolor Holo Green.
Then, I went to stamping! I first stamped the flourish-like design from the RA-120 plate with Konad white, followed by the Ivy circle design on the tips of my nails with Konad Green.
The final touch was topping everything off with Seche Vite.
Here's the finished product:

 I envisioned this manicure as Ivy flowing over a pot, very spring-like. I think I was able to convey that in the final look.
Here is my favorite, the extreme closeup. Look at how pretty that Kleancolor Holo Green comes through:

Here are the materials I used:

I first painted all my nails with Funky Fingers Gesso, followeed by Kleancolor Holo Green.
Then, I went to stamping! I first stamped the flourish-like design from the RA-120 plate with Konad white, followed by the Ivy circle design on the tips of my nails with Konad Green.
The final touch was topping everything off with Seche Vite.
Here's the finished product:


Here is my favorite, the extreme closeup. Look at how pretty that Kleancolor Holo Green comes through:

Monday, March 11, 2013
Bring on Spring!
Spring is fast approaching, and since green is very in for March I wanted to do a green spring inspired manicure.
I started with Kleancolor Jazz Olive, a nice metallic golden green polish.
To spruce this up, I turned to Red Angel plate RA-104 and used the image with leaves and lines on it.

I used Konad Green stamping polish and stamped onto all my nails. I then took Kleancolor Diamond Green and put it above the first green line on all my nails to give it a French tip look.
Here it is:

Here are a few more angles:


And, a closeup of one nail to see the design better:

Hope Spring will soon be here! We are trying a vegetable garden this year and can't wait to get it going outside :)
Have a great day!
I started with Kleancolor Jazz Olive, a nice metallic golden green polish.
 | ||
| Kleancolor Jazz Olive |

I used Konad Green stamping polish and stamped onto all my nails. I then took Kleancolor Diamond Green and put it above the first green line on all my nails to give it a French tip look.
Here it is:

Here are a few more angles:


And, a closeup of one nail to see the design better:

Hope Spring will soon be here! We are trying a vegetable garden this year and can't wait to get it going outside :)
Have a great day!
Thursday, February 14, 2013
Valentine's Day 2013 Manicure
Happy Saint Valentine's Day!
For today's manicure I went with the ever-popular heart theme in pink, white and red.

I am going to do a nail-art tutorial on this look because I think it turned out pretty nice and wasn't that hard to do.
Here are all the tools I used:
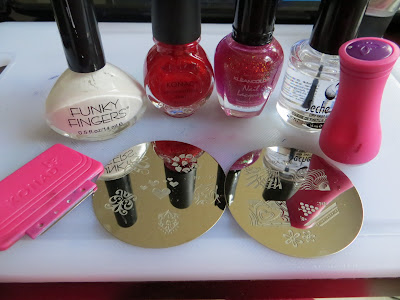
Tutorial:
One final photo with the finished look:

For today's manicure I went with the ever-popular heart theme in pink, white and red.

I am going to do a nail-art tutorial on this look because I think it turned out pretty nice and wasn't that hard to do.
Here are all the tools I used:

 |
| Red Angle Plate 120 |
 |
| Red Angel Plate 106 |
Tutorial:
- First, I painted my nails with Funky Fingers Gesso - 2 coats
- Painted nails with Kleancolor Fuschia Holo - 3 coats
- I used RA-120 with Konad Red to stamp the hearts on both of my thumbs, then applied Seche Vite top coat over both thumbs
- With Funky Fingers Gesso and RA-106, stamped the whole nail heart pattern onto the other 4 fingers on each hand, then applied Seche Vite top coat.
- Used Glitter Gal Type O on tips of nails on 4 fingers with nail stamp.
- Used Glitter Gal Type O and small nail art brush to make dots along the two hearts on the all-over nail designs that I just stamped on my nails.
- Added one final coat of Seche Vite to all nails :)


One final photo with the finished look:

I love how this turned out and hope you all have a great Saint Valentine's Day!
Saturday, February 4, 2012
Santa and his Chimney

Here is a photo of the items I used:
-OPI Girls Just Want to Play
-OPI Baby It's "Coal" Outside
-China Glaze Sexagon
-Ulta Set The Nude
-Seche Vite Top Coat (Not pictured)
-XL Stamping Plate A
 Started out with OPI Girls Just Want to Play as a base on all nails.
- Took OPI Baby It's Coal Outside with the "brick-like" image from the stamping plate and did pointer, middle and pinky fingers. I then did those 3 tips as well. I put China Glaze Sexagon on my ring finger as an accent to be sort of like snow. I then painted my thumb with the Ulta polish and drew the santa face with a dotting tool. I used Konad White and Red for the hair and hat details.
 Here's the finished look! LOVE the holo in China Glaze Sexagon.

 Interesting close-up of the holograph in regular evening light. I thought this looked really cool. Kind of like trying to take a photo of fireworks or lights at night.
 Here's a neutral eye look I also did. I used some colors found in a pallette I bought around Christmas time at Dollar General.
Subscribe to:
Posts (Atom)